Showing posts with label new shop. Show all posts

Monday, 24 July 2017

The Secret Life of Biscuits (A Tutorial of Sorts), Stone Pelicans and an Interesting New Glue. . .

Wood or Polymer clay?

Well, I've been horribly busy with a long discussed and procrastinated over DIY project - vis, Putting up false wood panelling in the hall of our house. False, because I am using MDF to make a series of 'frames', the inside of which is the plain wall. Paint it all and you wouldn't know that it wasn't all wood, and if you are careful, you can make it look like it's been there a long time. . .

You see, our house dates from circa 1780, but you wouldn't really know to see it on the inside apart from the proportions, nice high ceilings etc. It was messed about with a fair bit over the years, including being, what our local builder calls, 'farmerised', which is a process of covering over or ripping out old clay tile floors, likewise with old inglenook fireplaces, bannisters etc and generally getting rid of rustic charm or Georgian detail wherever it can be found and replacing with lino, plasterboard, york stone and strange wallpaper ;-) Something farmers seem to have got the blame for. Well, it was a farmhouse so I guess in this case farmers were the culprits. . . We are lucky in that the house wasn't totally trashed, and that the previous owner uncovered a nice tile floor and a previously boxed in inglenook fireplace when they bought the place forty years ago.

Our task, as we see it, is to pretend that none of the farmerising happened, and reconstruct a kind of faux Georgian-ish interior. Not making it a slavish restoration project as such, but more of a creative injection of charm and interest in line with our ideas of what might have been there before and what we would like to see, and all in line with a low budget too!

Work in progress, plus kitten

Anyway, the reason I am wittering on about it is that I am finding that my DIY excursions often have a the side effect of giving my ideas for beads etc. 
The MDF 'frames' I am making are joined together using something called a 'biscuit joiner'. This tool makes a groove in the piece of MDF or other wood you wish to join to another piece of same, in which you made a similar groove. Using the same tool set up the same means that your grooves should line up perfectly and be in exactly the right place for the two pieces to join up seamlessly by using a 'biscuit' which fits nicely in the two grooves. It works well, once you know what you are doing (I'm getting there. . .) These 'biscuits are like small, flat ovals of plywood, and are of a size and shape that to my mind could make a good template for a polymer clay bead/charm. (15mm by 19mm by 4mm)

size 10 biscuit - 15 x 19 x 4mm

Above is what they look like. You could view the following as a sort of tutorial or at least something to try if you come across a biscuit or two, (100 for about ten pounds online) follow along. . .
They are made of three layers, like plywood, and are maybe a bit thick, so I tried carefully splitting one down the middle with a craft knife/tissue blade. 

Split in half to expose nice wood texture and reduce thickness

I liked the splintered wood texture that resulted, so firstly I tried pressing that into a piece of raw polymer clay as a texture stamp, then cutting round it with a craft knife and baking the resulting shape. 
Once it was baked I decided to use the wooden half biscuit as a backing piece for it, so I stuck it, splintered texture side out, onto the back. Actually, I used the other half of the biscuit I split earlier as it had a slightly different texture pattern but the principle is the same. 
Then I had some fun treating the surface with alcohol inks, sanding it off, etc. It turned out looking cool, but a lot like wood. I wasn't sure if this was a good thing or not, or if it was what I wanted, as if it looked like wood I might as well not have used polymer clay at all ;-)


I painted the back too. I used acrylic inks this time, the coverage was better on wood than alc inks I found.

The real wood back of the faux wood bead

Following on from that my next experiment was to use a different texture instead of splintered wood, so I reached for my stack of digital photopolymer texture sheets and tried one of those. I used the same technique as before and the same half biscuit backing concept. It looked promising, and  after a bit of painting and distressing etc it looked really interesting. So I reckon there is quite a lot of scope for polymer clay experimentation here. . . 

Textured and treated surface

Talking of which, I had another idea and tried cutting the half biscuit in half again across the width, which gave me another nice couple of shapes which could be more of a manageable size for earring charms maybe. 
I tried another of my texture sheets, a simple, bold one this time, combined it lightly with the splintered wood texture on top of it, and then, after baking,  kind of wiped the two pieces gently across a blue stazon ink pad. I was pleased with how they came out too. I'll definitely try some more of those. . . And get a couple of different colour ink pads.

Half biscuits - textured and coloured

This post has been a bit long so I will keep the rest of this missive brief. . .

We found a pair of stone pelicans at our local antiques street fair at the weekend. They fit in nicely with our front door area and add a bit of eccentricity, not to mention a slightly gothic vibe too. Fun. They can keep a careful eye on any visitors ;-)

Stone pelicans in place above the door

As for the interesting new glue. The adhesive I was using to attach bits of moulding and dado rail to the fake panelling was new to me. It's a kind of two part epoxy stuff, but part one is a spray. You spray one surface, let it evaporate, then apply glue to the other surface, when pressed together they form a very strong, superglue type bond in about ten seconds. Brilliant. It may have polymer clay and jewellery uses. Not sure yet but I will keep it in mind.
Well, until next time,
Jon x

Thursday, 13 July 2017

Polymer Clay 'Turned Technique' Hints, A New Discovery and just maybe. . . KITTENS!!

Turned technique on Image Transfer beads. . .

Well, not wishing to start off what is supposed to be a polymer clay bead type blog with pictures of kittens, I will start off with a pic of my newest discovery/experiment ;-)

I realised that I can use my 'turned effect' technique on image transfer beads. Interestingly, this confirms to anyone wondering what I am doing, that, even though the results may look like it, I am not using a lathe. (though I like the idea of trying one out. . .)

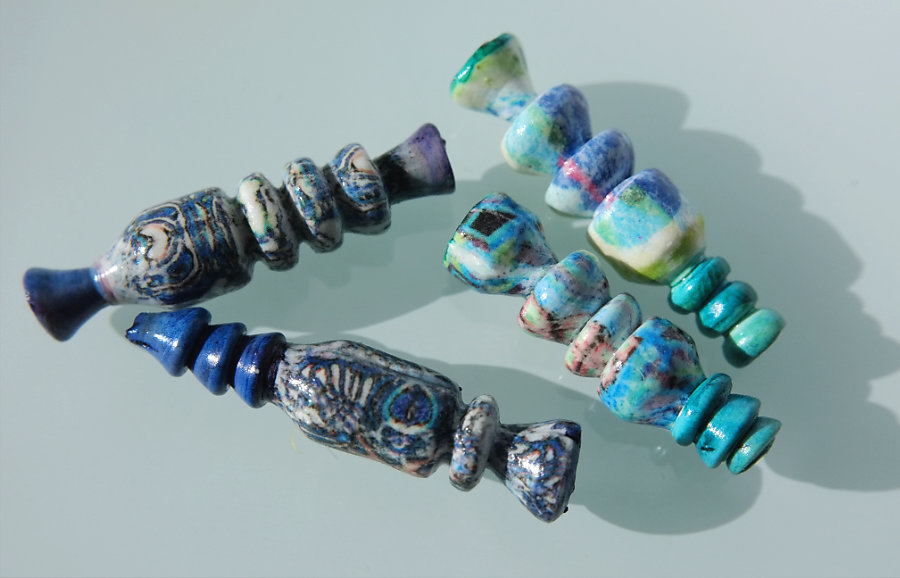
So, I hear you cry, what are you doing? Good question. It's hardly rocket science but in case you hadn't worked it out, what I am doing is basically rolling unbaked polymer clay between various things. All sorts of things but mainly everyday/hardware store/DIYleftover type things. For some deep seated and so far unexplored reason I love using things for purposes for which they were never intended. . . Especially when the results are really cool. And as you know I am always ready to follow the fascination. . .
The above pic is a record of my first experiments. Nothing that useful in themselves, but the possibilities are certainly there. I was quite pleased that the process doesn't degrade the image as much as I thought it might. And anyway, even if it does, it's part of the effect as far as I am concerned. 
So now you know.

Anyway, enough polymer clay rubbish. The main story in my life this week has been KITTENS!

Our neighbour is a fosterer for the local branch of a cat rescue charity, and some time ago I had mentioned the possibility that we might want to adopt a kitten, or maybe, just maybe, two. . .
Well, last week she came round to tell us that three little silver tabby and white kittens were ready for rehoming. The catch was that they don't let single kittens from a litter go, we would have to take two. . . We discussed this, and agreed, but very firmly drew the line at three. No way. Out of the question we said. . .

Yeah right. 

Say hello to our three newly adopted kittens! Our firm line was obliterated the millisecond we saw them. I mean, how could we leave one all on it's own? Hard as nails, us. . . sigh. . .

The one at the back is the boy, the other two are the girls, and very sweet they are too ;-)

Awwwwwww. . .

OK enough about kittens, this is a polymer clay blog after all, below are a selection of rolled/turned effect beads I made last week. You may have seen them before on FB or IG but they are worth another look. They are in my SHOP, along with some more recent stuff and just about all my Etsy shop's stuff which I have transferred but still not finished rejigging the titles etc.
I changed the theme to a more mobile friendly one, which was a pain, but had to be done as when I checked the last one out on my iPad the writing was so small as to be illegible. Not good. It should look much better now.

SOLD

click the pic to view the shop listing

click the pic to view the shop listing

click the pic to view the shop listing

 Further to my image transfer rolled/turned beads at the top of this post, I made a few further experiments and the beads below were the result. Kind of cool without being obviously image trans. Hmmmm. . .

click the pic to view the shop listing

I couldn't possibly go without sharing another pic of the kittens, or at least two of them, showing how deeply traumatised they were by the adoption process ;-) They are such happy, socialised, well adjusted little beasties. . . I wish they wouldn't insist on walking over the trackpad on my laptop though. One managed to erase three lines of text, and another one just launched iTunes. . . !

See you next time,
Jon x


Saturday, 17 June 2017

White Point mutterings, a Cool Cutter Set and a small Varnish Revelation. . . Oh, and NEW SHOP!

The image is also a link. . .

Well, the exciting news first. . . Vic, from up the road fixed my lawn mower. . .

Yeah, OK, that's not really the exciting news, though it did mean that I could finish my assault on the nettles and knee high grass in the orchard. . .

No, the potentially exciting news is that I have started up a new shop at another selling venue!
My ingratitude for the special gift of invisibility bestowed upon my shop by Etsy knows no bounds. ;-)

The images all link to the relevant page in my new shop. . .

I did a bit of research and found a site that is reasonably cheap per month, has no listing fees or sales fees, has usable themes, has the ability to import Etsy listings and link to them etc, and has good and quick customer support (unlike Etsy).
It has very little traffic of it's own, but I figure that if I am going to get stuck into generating my own traffic, I may as well point it to my own standalone shop rather than the train wreck (imho) that Etsy (especially Etsy Studio) seems to be set on becoming.

Except this one hasn't been listed yet. . .

So I have spent long hours working my way through the 300 or so listings I imported into my new shop, tweaking the seo and taking out any etsy links etc. I am about half way through the process so I think I am ready to share what I have been doing with a hopefully sympathetic audience. The site I chose is called 'Indiemade' and has been set up with sellers of handmade stuff in mind.

https://jbdrusticorganic.indiemade.com/store    is the link to my new shop.

Please feel free to check it out. If you feel moved to let me know what you think, don't let me stop you. Anything that bothers you about it, or that is confusing, please give me the benefit of your opinion. Many thanks x Meanwhile I shall continue the tweaking. BTW, all my newer stuff is on there, and at least most of the pics on this post are all linked to those items in my shop. Efficient or what? Phew. . .

Pic is a link as before. . .

So, on to the mutterings. . .
I've been having trouble getting my photos consistent between my camera and my computer. I am setting the white point manually, so that the different colours of the beads I am photographing don't affect each pic differently, but however close I get the colours on my camera screen, the exposure and white point seem way off on my computer. At least they are fairly consistently way off, so I can bring them back in Pshop to a certain extent, but it is a bit of a pain. The monitor is calibrated and all that so I am not quite sure what I am doing wrong if anything. Never mind, just moaning, I'll sort it, ignore,

And this one. . .

As you may be able to tell from the photos sprinkled lovingly throughout this post, I have bought a set of interesting shaped cutters. They are meant for working with leather, but are great for polymer clay. They come in sets of 26 or so and can be found on the usual big online venues for around ten pounds.

This one too. . .

So far I have just used them to make relatively crisp and clean image transfer charm type things, but I will explore further, texturing and distressing and all that.

And of course, this one. . .

My small Varnish Revelation is only a personal revelation, as most sensible people would have worked it out ages ago. . . I started applying Varathene varnish before baking! gasp! It does brighten up the resulting image a bit and seems to prevent any fading during baking. Obviously, the down side is that any distressing of said beads after baking might be harder. I haven't tested this yet, but I will in due course.

Aye well, it's all a learning curve,

Cheers,
Jon x